How To Visit Parque Nacional Cajas for Cheap – A TTT Guide
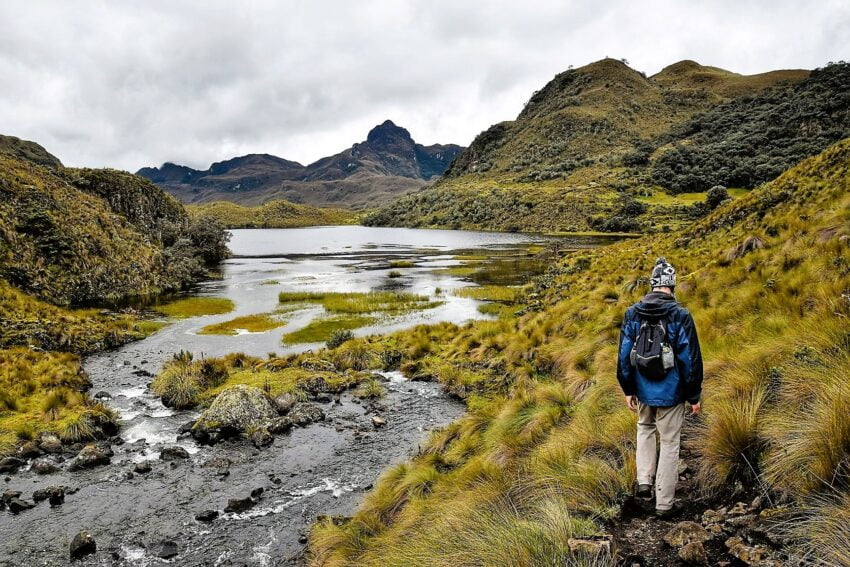
One of the great things about being in Cuenca, Ecuador is that there are so many things to do and see, without ever leaving the city. But there are really spectacular regional day trip opportunities too! And one of the best trips is to visit Parque Nacional Cajas, a spectacular national park one hour outside of Cuenca. It is absolutely worth your time if you are looking for a hike with epic-level views and solitude, yet won’t kill you for making the effort.
And as readers of our blog know, this is exactly the kind of thing we like! So true to form, we figured out how to get to Parque Nacional Cajas and hike the trails, for as little money as possible.
It was a great way to spend the day, for only $6.10 USD per person!
Let us show you what we did and how we did it, so you can plan your own trip too!
Why Visit Parque Nacional Cajas?
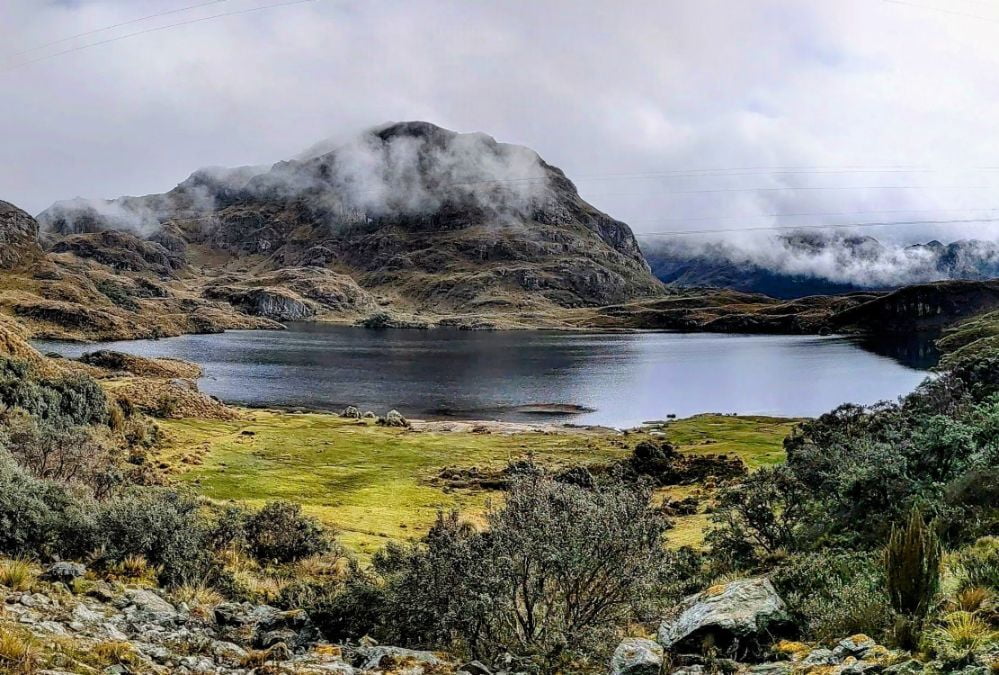
Parque Nacional Cajas is located in the province of Azuay in southern Ecuador, where the Andean mountain range is older and less volcanically active. In this area, the mountains form a plateau of sorts, where large amounts of water accumulate, forming a massive alpine wetland.
Parque Nacional Cajas is full of bodies of water: there are 165 lagoons that are >1 hectare in size and 621 lagoons smaller than that. The wetland plateau forms a green and golden carpet of valleys that all border their own fresh-water lagoons, which are in turn interconnected by small streams.
Because of the scale of the wetlands, the presence of migratory birds, and the importance of the water as a resource for nearby villages, Parque Nacional Cajas is recognized as a wetland of international importance.
For visitors, the park’s landscapes and biodiversity will be of interest to anyone who loves the great outdoors. And there is a system of trails to help you explore this area to its fullest! You’ll want to bring your camera.
How To Visit Parque Nacional Cajas
The lack of good information online may fool you into thinking that you need a purchase an expensive guided tour to visit Parque Nacional Cajas.
But this is not the case at all! And you’ll save a ton of money visiting on your own.
However, you do need to do some basic preparation and know what you are getting yourself into before you visit.
Here is what we suggest you do to plan your visit to Parque Nacional Cajas.
STEP 1 – Preparation
If you want to hike in Parque Nacional Cajas, you must prepare.
Although the elevation gain isn’t terrible and the distance is reasonable, the hike is at ~4,000 meters altitude. And the weather can change quickly! So you need to take some basic precautions.
This is how we suggest you prepare for the hike, for maximum safety and enjoyment:
1. If You Can, Be Acclimated to the Altitude
Parque Nacional Cajas is close to 4,000 meters altitude, so it is best if you have been in Cuenca, Ecuador (~2,500 meters altitude) for at least a few days to make sure your body isn’t reacting badly.
If you don’t have the luxury of time to acclimate, at the very least monitor how you feel before you go and decide accordingly.
And do not over-exert yourself during the hike! Go slow, be well-hydrated at all times, and enjoy the views.
2. Download the Maps.me App to Your Phone
You need Maps.me to navigate the trails with confidence.
Trail signage is reasonable, but the signs can be far apart. And sometimes the trail itself branches unexpectedly, adding confusion on which way you should go. And in an environment like this, the trails can be dangerous if you get lost in less-than-ideal conditions.
So download Maps.me, then download the map of the park area before you leave Cuenca!
3. Wear Good Hiking Shoes, Preferably With Ankle Support and Aggressive Tread
Our hike route is not terribly steep, but being wetlands the trail can be wet, muddy, and slippery. Wear hiking shoes with good tread and preferably some form of waterproofing (like Gore-Tex).
4. Wear Clothes for Chilly Weather
At these altitudes, you’ll want to protect against the elements. We wore hats and light gloves, in addition to a base layer under our normal hiking clothes. We also wore hardshell outerwear to directly protect against the wind and rain.
And we did fine.
Check out our selfie pictures and you’ll get the idea.
5. Check the Weather!
Ideally, the forecast will be decent on the day you decide to visit Parque Nacional Cajas. But sunny days may be few and far between depending on the time of year you go. This is fine, depending on your hiking goals.
On our route, you can still get great views in overcast conditions since you will not be climbing to the tops of any mountains. But if the forecast promises torrential downpours, you may want to reconsider making the trip.
All this said, be sure to bring some form of rain gear. The weather in the mountains can turn bad quickly, even if the forecast suggests otherwise.
6. Bring Drinking Water, Snacks, and Sun Protection
The UV index is very high at altitude in the Andes mountains and hydration is an excellent defense against the symptoms of altitude sickness. Be prepared.
7. Get an Early Start
If you are at the trailhead at 8 am and follow our route, your hike should time out so you make it back to the interpretive center by 1 pm. And this includes gawking for photography, views, and rest stops.
Do yourself a favor and take breaks every hour or two. It will make your whole day better and your bodies will thank you!
STEP 2 – Getting to Parque Nacional Cajas
This is easy.
Just go to the Cuenca Terminal Terrestre (bus station) and enter the bus departure area through the automated turnstiles.
Note that it will cost you $0.10 USD to enter the bus departure area. Once you pass through the automated turnstiles, you’ll see a long row of buses with passengers boarding.
Look for the buses going to Guayaquil. Ask any staff member if you can’t find where the Guayaquil buses are. They’ll point you in the right direction.
When you find the buses leaving for Guayaquil, confirm with the driver (or attendant standing in front of the bus) that the bus stops at “Cajas”. The answer should be YES, as the best route to Guayaquil goes right through Parque Nacional Cajas. If so, get on the bus and let the driver know that you want to be dropped off at “Cajas”.
You’ll pay the bus fare ($3 USD per person) en route to Parque Nacional Cajas, so have exact change.
Buses leave for Guayaquil frequently, but we suggest that you get on a bus that leaves at 7 am. It takes 1 hour to get to Parque Nacional Cajas from Cuenca, so you’ll be dropped off at the park entrance right as it opens at 8 am.
There is a bus stop shelter across the street from the park entrance. When you are ready to return to Cuenca, that is where you’ll go to wave down any bus going in that direction. You shouldn’t have to wait more than 30 minutes. Just be sure to have the $3 USD return bus fare handy!
STEP 3 – Admission to Parque Nacional Cajas
Entrance to Parque Nacional Cajas is FREE!
But you are still required to register at the administrative building next to the trailhead, so be sure to bring a photocopy of your passport information page.
Once they record your information, you are free to wander the park as you please.
Also of note is that there is a conference center, bathroom, and cafeteria in a separate building in the entrance complex.
It is highly recommended that you use the bathroom before you begin your hike!
The cafeteria was closed when we arrived at 8 am, but it was open when we were finished with our hike. It was a nice place to sip hot chocolates after a hard day of hiking! You can buy breakfast, lunch, snacks, and drinks there too.
STEP 4 – Exploring Parque Nacional Cajas
This is the fun part.
When you enter the park, you’ll see a sign showing the major park trails. But honestly, once you get on the trails, it isn’t all that useful.
Better to have Maps.me (and the area map) downloaded to your phone so you can navigate the trails in the absence of a cell signal.
Our Cajas National Park Loop Trail Map
If you really want to explore the park thoroughly in one day without killing yourself, we suggest the following loop trail.
Note the 5 waypoints – they are at key intersections.
Our map actually connects several known trails that are suggested to hikers, and you should walk in a clockwise direction (highly recommended).
In total, it is 4 miles (6.4 km) in length and has an elevation gain of 843 feet (257 meters).
Compared to many of our other hikes, this one may seem pretty tame. But remember, you will be between 3500 – 4000 meters in elevation under potentially slippery conditions, so go slow and take care.
And with all of the 360-degree views, you won’t mind going slow.
To Waypoint 1
Getting to Waypoint 1 from the trailhead is easy, as it is just below the administrative center where you registered. There is a mirador (= viewpoint) that allows you to admire the view of Toreadora Lagoon without even having to hike anywhere!
Follow the signs pointing to the left, directing you along the Toreadora Lagoon trail (= Sendero Toreadora).
To Waypoint 2
You’ll skirt clockwise around the western side of Toreadora Lagoon, and be continually rewarded with epic water views.
And the vegetation gets very interesting too, especially at this altitude.
We heard peeping frogs (hidden in the grass) and saw rabbits scurry into the underbrush. The trail at this point had wet spots but it was fine with proper hiking boots.
When you get to the Waypoint 2 intersection after the bridge, continue clockwise on the path along the edge of Toreadora Lagoon.
To Waypoint 3
The views along this stretch of trail continue to be fantastic.

But the trail gets a little wetter, a little steeper, and a little more muddy. Nothing to be concerned about if you have proper hiking boots, but you have to pay more attention to your footing than before.
When you get to Waypoint 3, you’ll notice that you’ll be at an intersection where you could climb north up a brutal incline to Cerro San Luis (Ruta 2 – blazed green). Cerro San Luis has the best high-elevation views in the park!
But note the elevation change on our map! It is an absolute killer. And if the conditions are wet, a fall during the descent from that route could seriously injure you. Last, if the conditions are cloudy, Cerro San Luis is likely to be completely obscured, ruining your views.
We suggest ignoring Cerro San Luis on this hike, at least for now.
Just keep hiking eastward, following the pink Ruta 1 signs. You’ll follow these pink signs for the rest of the loop we’ve planned for you.
Better to plan a separate trip just to hike Cerro San Luis when the weather is favorable. For that much pain and suffering, you’ll want to maximize your chances of epic views! That, and you’ll be completely exhausted after climbing that elevation gain. You’ll certainly want to call it a day after you get back down.
To Waypoint 4
The stretch of trail between Waypoint 3 and Waypoint 4 is probably the most challenging on the entire loop.
It isn’t that the trail is excessively steep. It is that the conditions can be VERY wet and slippery, so the going is treacherous, especially when there is a slope.
If you don’t pay attention, there are a couple of saturated spots where you can sink into the marsh past your knee! So it is always best to hike with a friend who can rescue you if that happens.
Ask us how we know.
That said, the views are still epic.

And you’ll come to a point where you briefly enter the San Luis Forest.
But the forest wasn’t that extensive at this point in the park, and we eventually emerged into new panoramas.


Exiting the other side, you’ll see killer views of Unidas Lagoon.
Following the path, you’ll eventually descend toward a bridge that crosses the stream exiting from Unidas Lagoon.
After the bridge, make sure to take a right and follow the path southeast, parallel to the stream.
To Waypoint 5
This stretch of trail is much easier than the last segment. Conditions are flatter with a gradual descent and much less wet.
And the views are gorgeous!
It reminded me of when we hiked through the marshlands near Killarney, Ireland a decade ago, except those trails weren’t at 4000 meters of altitude.
We hiked parallel to the stream for a while.
And eventually, the trail led to Totoras Lagoon. Spectacular views everywhere you look.
The trail led us along the edge of Totoras Lagoon to Patoquinuas Lagoon. The impressive visuals were relentless.
Eventually, the trail reached an easy-to-miss trail intersection (Waypoint 5) where we needed to hike westward towards a camping area.
This wasn’t the first time on this hike that Maps.me came in handy!
Back to Waypoint 1
From the campground, the trail gradually snaked up an incline leading back in the direction of the park entrance.
And with increasing elevation came great views of where we had just hiked.

The trail took us past Apicocha Lagoon…

And past Marmoicocha Lagoon, which we could only see from a distance.
Eventually, the trail led back to the Parque Nacional Cajas entrance campus.
What a hike!
It was a great test of my health, considering my recent problems with altitude sickness.
And both of us did very well! I think I’ve finally recovered.
The altitude made the hike more of a challenge than normal, but we felt good at the end and were in very good spirits. We celebrated with hot cocoa, canelazos, and churros at the park cafeteria ($3.25 USD total)!
And when we were done we flagged down a public bus back to Cuenca and were back in our Airbnb by about 3 pm.
Closing Thoughts About Parque Nacional Cajas
This place is special.
If you spend any amount of time in Cuenca, Ecuador, and enjoy the great outdoors, then visiting Parque Nacional Cajas is absolutely required.
I’m not sure how long it has been since we have been to a place where the landscapes were so dramatic, yet took so little effort (and money) to visit.
For the two of us, $12.20 USD (plus the cost of cafeteria treats) for a full day’s entertainment is a pretty good deal!
We hope you found our travel guide entertaining and informative. May it inspire you to make your own adventures!
Until next time…
Thanks for reading!
If our posts have saved you time, money, or are enjoyable in some other way, BUY US A COFFEE! It helps cover the costs of our blog, keeps our blog ad-free, and motivates us to continue posting about our experiences.
And leave a comment below and subscribe to get email notifications whenever we post!
Follow Two Travel Turtles on Facebook and X.


